

Contact Info
2055 Limestone Road, STE 200-C in Wilmington, DE 19808
(888) 702-7866
info@rshosting.com
Live ChatA slow-loading website frustrates visitors and affects search rankings. If pages take too long to appear, people leave, and search engines notice. One major cause? Render-blocking resources: CSS and JavaScript files that delay content from displaying. Removing them helps your site load faster, improves user experience, and boosts performance in tools like Google PageSpeed Insights.
In this guide, you’ll learn what these files are, how to find them, and simple ways to remove them so your website loads faster.
- What Are Render-Blocking Resources?
- How to Identify Render-Blocking Resources.
- Autoptimize: The Best Free plugin
- LiteSpeed The Easiest Way to Eliminate Render-Blocking Resources
- Manual Optimization Techniques for Advanced User
- Additional Performance Optimization Tips
What Are Render-Blocking Resources?
When you visit a webpage, your browser follows a sequence: it reads the HTML, fetches linked resources like stylesheets and scripts, and then renders the page for you to see. But sometimes, specific files, especially CSS and JavaScript, interrupt this process, forcing the browser to pause rendering until they are fully loaded. These are called render-blocking resources.
Browsers load pages from top to bottom, but if CSS or JavaScript appears first, they must process it before showing anything. This creates delays, especially when those files aren’t needed for above-the-fold content.
Google measures website performance using Core Web Vitals developing tool, which include:
- Largest Contentful Paint (LCP): Measures how long it takes for the main content load.
- First Contentful Paint (FCP): Tracks when the first visible content appears.
- Total Blocking Time (TBT): Evaluates delays caused by long-running scripts.
When your site has too many render-blocking resources, these metrics suffer, leading to lower rankings on Google and a poor user experience.
There are two primary approaches to eliminate render-blocking resources:
- Using Plugins: The most straightforward way, ideal for non-technical users.
- Manual Optimization: Offers more control, best for advanced users.
How to Identify Render-Blocking Resources
Before eliminating render-blocking resources in WordPress, you need to identify which files are slowing down your site. There are several free tools that make this easy.
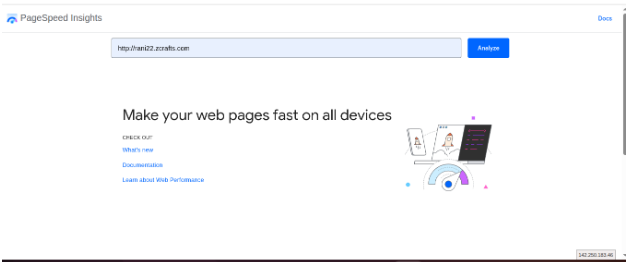
1. Using Google PageSpeed Insights
Google’s PageSpeed Insights (PSI) is the most accessible way to find render-blocking CSS and JavaScript. Here’s how to use it:
- Visit PageSpeed Insights.
- Enter your website URL and click Analyze.
- Scroll to the Diagnostics section and look for “Eliminate render-blocking resources.”
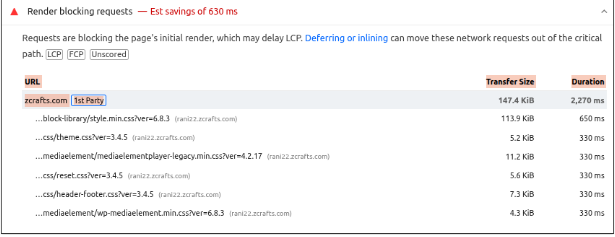
- Click the dropdown to view a list of blocking CSS and JavaScript files.
Each file listed contributes to slower loading times. If you remove or optimize these files, Google will also provide estimated time savings.
2. Checking GTmetrix for Waterfall Charts
GTmetrix offers a visual representation of how files load on your site.
Steps to analyze render-blocking resources in GTmetrix:
- Go to GTmetrix and enter your URL.

- Click Test Now and wait for results.
- Navigate to the Waterfall tab.
- Look for longer bars in the CSS and JS rows; these indicate delays.
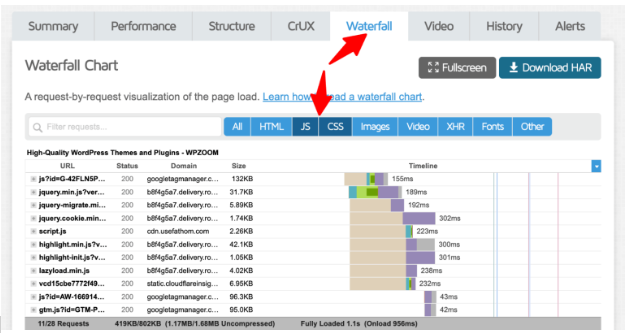
GTmetrix helps pinpoint exactly which resources are blocking rendering, making optimizing it easier.
3. Understanding How WordPress Themes & Plugins Contribute to Render-Blockin
Not all render-blocking issues come from core files. WordPress themes and plugins often introduce unnecessary scripts and styles.
- Some themes load multiple CSS files even when they aren’t needed.
- Certain plugins add JavaScript that blocks rendering, even if it’s not required .
- Heavy page builders often introduce extra scripts that slow down loading.
To identify problematic plugins and themes:
- Disable plugins individually and retest your site speed using PSI or GTmetrix.
- Switch to a lightweight theme and compare load times.
- Use a cleanup plugin to disable unnecessary scripts on specific pages.
Using Plugins to Eliminate Render-Blocking Resources
If you want a quick and effective solution, plugins can handle JavaScript deferral, CSS optimization, and caching without requiring manual code changes. Here are the best options:
1. Autoptimize: The Easiest Way to Eliminate Render-Blocking Resources
If you’re looking for a free option, Autoptimize is a great choice. It aggregates, minifies, and defers scripts, helping to remove render-blocking resources and improve page speed.
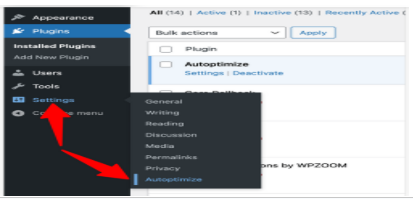
- Install and activate Autoptimize from the WordPress plugin repository.
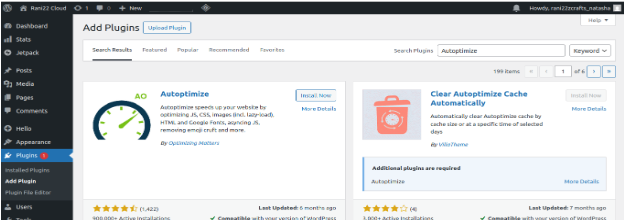
- Go to Settings > Autoptimize.
- Enable these JavaScript Options:
- Optimize JavaScript Code
- Do not aggregate but defer?
- Also defer inline JS?

Enable these CSS Options:
- Optimize CSS Code
- Eliminate render-blocking CSS?
- Save changes and clear the cache.
For better results, pair Autoptimize with a free page caching plugin like Cache Enabler. This combination ensures both faster script execution and improved overall site speed.
1.LiteSpeed cache: The Easiest Way to Eliminate Render-Blocking Resources
LiteSpeed cache The Litespeed cache plugin is a very fully featured plugin. It can be used to do a lot more than just deal with render blocking resources. It can be used to integrate object caching and also has minify and combine options.
Litespeed Cache is a great all-in-one plugin for caching, optimization, and image optimization. It works best on servers using the Litespeed web server.
1.Install & Activate the LiteSpeed Cache plugin from your WordPress dashboard.
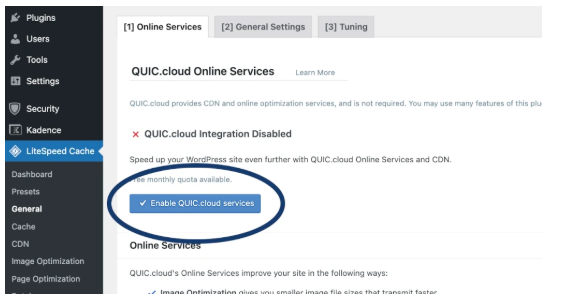
- Go to LiteSpeed Cache > General and connect to a QUIC.cloud account by clicking “Enable QUIC.cloud services” under the “Online Services” tab if you want to use their critical CSS generation service.
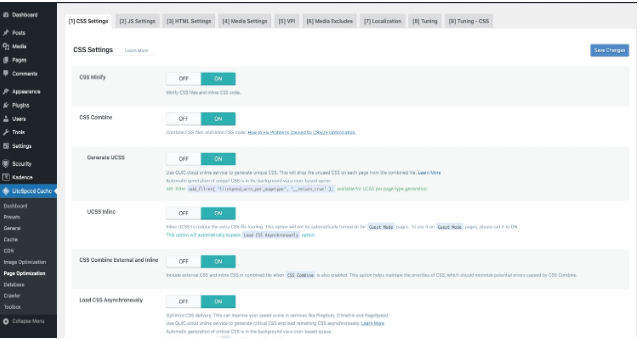
- Go to LiteSpeed Cache > Page Optimization.
- Under the CSS Settings tab:
- Enable CSS Minify.
- Enable CSS Combine (optional; test performance).
- Enable Generate UCSS.
- Enable UCSS Inline
- Enable CSS Combine External and Inline.
- Enable Load CSS Asynchronously.
- Click save changes
- Under the JS Settings tab:
- Enable JS Minify.
- Enable JS Combine (optional).
- Enable Load JS Deferred.
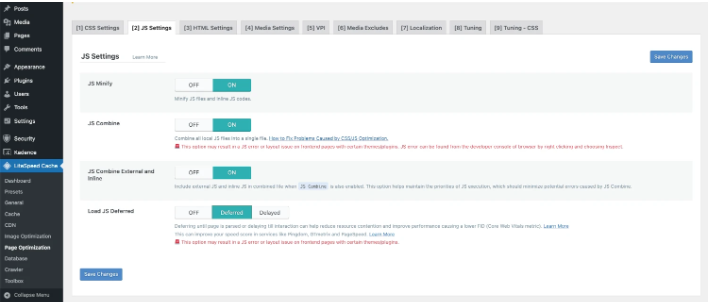
- Save changes
- Optionally enable Delay JS and configure specific scripts to delay (e.g., tracking scripts).
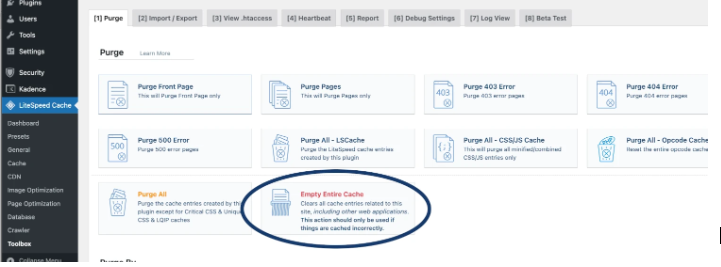
- Clear all caches under LiteSpeed Cache > Toolbox > Empty Entire Cache.
After completing the above steps, test your website to ensure everything works correctly, as adjustments may be necessary for your specific use case.
Manual Optimization Techniques for Advanced Users
If you want more control over how your website loads resources, manual optimization allows you to fine-tune performance beyond what any plugin can do.
Before making any changes, always take a full backup of your site.
1. Add defer or async to JavaScript Files
JavaScript can slow down page loading when it loads before the main content. To fix this, you can add defer or async to your script tags so they don’t block rendering.
- defer → loads the script after the page, in order
- async → loads the script independently, anytime
Where to Add These Attributes
Your script tags are usually located in your theme files:
/wp-content/themes/your-theme-name/

Find this line in header.php or footer.php:
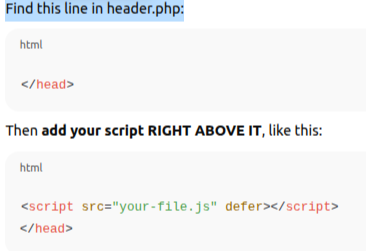
Move Non-Essential Scripts to the Footer
Scripts in header.php load before the page displays.
<script src=”your-file.js” defer></script>
This loads content first and scripts second.
2. Inlining Critical CSS for Above-the-Fold Content
To make your page load faster, you can inline the most important CSS (the styles needed for the part of the page users see first). This lets the browser show content immediately without waiting for large CSS files.
Steps:
- Use a tool like PurgeCSS or Penthouse to create critical CSS.
- Paste that CSS directly inside the <head> section of your page.
- Then load the rest of your CSS without blocking the page:

This removes render-blocking CSS and helps your site load faster.
3. Minify and Combine CSS & JavaScript
Minify your CSS and JavaScript using online tools and replace the original files, and combine multiple CSS or JS files into one to make your site load faster.
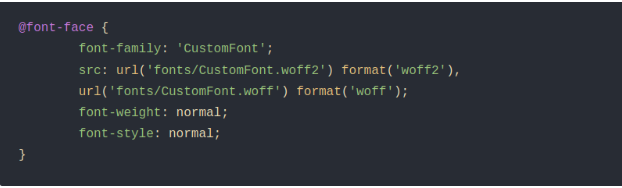
4. Optimizing Font Loading (Host Google Fonts Locally)
Fonts from Google Fonts are often loaded from external servers, slowing down your page. Hosting them locally improves performance.
Steps: 1. Download from Google Webfonts Helper.
- Upload to /fonts/ folder.
- Add to style.css as shown below:
Remove the Google Fonts <link> tag from your theme’s header.php file.
Preloading fonts can further improve speed:

Additional Performance Optimization Tips
Removing render-blocking resources is only one part of speeding up your WordPress site. Here are a few more simple ways to improve loading time and Core Web Vitals:
- Enable browser caching to load repeat visits faster.
- Use a lightweight theme to avoid slow, heavy designs.
- Reduce HTTP requests by limiting scripts and combining CSS/JS files.
- Enable lazy loading so images load only when needed.
- Use a CDN for faster global delivery of your content.
- Optimize your database by removing unnecessary data.
Enable GZIP compression to shrink files and speed up loading.